Tuesday, 24 November 2015

Photoshoot with Gold Leaf.


I assisted on a photoshoot which allowed me to see the application of some gold leaf a little bit better.
I did one of the make-up looks but not this one.
It was really good to work on the shoot, I worked with Lauren and Sian as a team to create a variety of looks for a fashion student to shoot.
I liked the fast pace of it all to do a look, then they shot it, changed clothes and came bac for us to change the hair and make-up we had around 15 minutes in between changes and it was a nice insight into that kind of career, session styling kid of work.

I was a bit timid to do the Gold leaf myself so I stuck to some other make-up instead which was slightly simpler.


Sunday, 22 November 2015

My Design Practice No.2

Final design practice for my makeup.

As I said previously we added some minor changed to the make-up such as the graphic liner and the covered eyebrows which I think really make a difference, we also had a chance to use the veil that I made and attached this with a spot of spirit gum onto the forehead and for the final assessment will also be gripped to the hair instead of clips on the side.


This final practice really gave me a lot of confidence for the final assessment and especially for Lauren as well because I could not have asked for my design to have been interpreted and produced to this standard and so distinctive to my actual design.
I think the veil and ruff, although not make-up and not integral to showcase any skill in that area really makes a massive difference to the over all effect of the design
The eyelashes still aren't added here but will be on my final outcome but overall I think everything came together and we haven't encountered any issues with any aspect of the design.


Final Idea Facechart


After receiving feed back from my previous face chart I had decided was my favourite, I looked further into why I had chosen certain features, between the techniques used and the reasons why I'd gone for a very macabre outcome.

I still wanted to have a mourning theme to go with my character but it needed linking more into Elizabethan so I've done this through the way the base will be applied and the brush techniques used after researching into some primitive make-up applications.
As well as the addition of the ruff and lace veil, I think this will really bring my character to life and add further reasoning behind my design.

I will employ the techniques we used in practical sessions such as using the finger to lightly blush the lips whilst pouted for texture, and also the happy mistake I made with the base, I will use the technique of powdering and re-applying for a really mottled and worn effect.

This links to my character growing up around the palace and being used to the finer things, I can really go over the top with the amount of products used because they would have been available to her.

The tears represent more crocodile tears, She would have been sad obviously at the death of the queen but from research I found out she had an affair with the queens favourite behind her back so it shows quite a deceiving side to her which I wanted to bring out.
I think the splashes on the lips and side of the face represent how toward the end of her life she was deserted and in poverty, it's almost as though after the Queen's death her life and all she knew came crashing down around her. It suggests turmoil and dis something in contrast to the smooth contouring on the eyes

I do still really stand by not going for gold within my design, I understand it's the ultimate way to symbolise riches and regality but I think with the black and the white the purple stands out  lot better than gold would have, It's still a very elegant and regal colour, along with reds and greens, but it just adds something different.

Making a Ruff and Veil


Looking into how a Ruff was made was really interesting and the videos and tutorials were really useful to watch, I unfortunately didn't have the time to make it to any kind of professional looking standard at all.
Some of the techniques to create these were really really intricate although the outcomes were very impressive.
It was good to see how they were traditionally made as well.

A good website I found that had a few methods and information was
http://www.elizabethancostume.net/ruffmake.html

One of the videos I watched -


I went and bought some black lace from a local material shop and it was surprisingly cheap.
I wanted enough to make a veil which would cover my hair for the final shots and to make a collar.

After some terrible practices, hours and hours of trial and error and multiple finger stabbings I managed to create something that resembled ruffled collar and simply attached some string to tie it around my neck.
Because the material was very thin I had to layer and layer and layer it to get a collar thick enough to stand up on it's own I used some starch spray but It didn't really work.
To make the veil I used a square of fabric and placed it over my Katie head and then with some simple stitching pulled in areas to make it fit over the head and to make sure it fell down in a water fall fashion around the face.
I'm not a seamstress so I think I did okay. The effect it gives is good.


Friday, 20 November 2015

Lauren Practice no.2

So after deciding that the initial design was a bit too simple we decided to add some gold into it using some different methods and products.

First we decided to add some gold from the Precious Metals palette, I added some simple eyeliner and a brow, I think the effect would work well if the brow was covered a lot more than just with supra colour. Bu it was an interesting thing to try in terms of eyebrows for the Elizabethan theme.
At least this gave us some more things to think about in terms of design, whether Lauren decided to use it or not.


We then went on to do some of the techniques we used for my design by flicking some of the gold Aqua colour onto the face to add something different and Lauren decided this is something she liked but she wanted to use it across the nose area to create freckles.
It was interesting to take a photo with the flash to see how it lit up on camera, gold is very light reflecting so sometimes it can be too much.


The most interesting thing we tried was Gold leaf on the face, I hadn't used this before, it wasn't planned but she remembered she had some in her kit.
So I had to be instructed on how to apply it because I've never used i before but I think I did well with it and got a good effect.
The idea was to make some veins creeping onto the face to give the effect she was two faced.
It was really hard to use the gold leaf as a product because it's so thin and flaky, It also kept sticking to my fingers when trying to apply it so to combat this I kept dusting them with powder.
I used vaseline to stick the gold leaf to the face, it' not necessarily an adhesive but it worked because the gold leaf doesn't need much to keep it in place,
Also because the gold leaf is so shiny it disguised any vaseline that was over the edges.
I used the gold Aqua colour to then add in any small veins with a thin brush, Although it's not as shiny and has a different finish I think it blended in okay. As well as filling in any gaps left.
I think if I were to do it again I would get closer to the hair line because there is a large obvious gap left.


Thursday, 19 November 2015

Laurens Practice


Lauren's design.

The final face chart that Lauren presented to me was


The products used
Illamasqua skin base mixed with Illamasqua satin primer
Illamasqua Finishing powder
Eyebrows Kryolan Supra white
Illamasqua eye shadow powder dizzy
Illamasqua eye shadow powder Justify
Illamasqua Gleam Aurora
Kryolan lip palette


I liked the overall ideas and colours that Lauren had chosen for her final design but it was quite simple. I think with the simplicity the application is more important with less to draw the eye away from certain areas, but I followed her instruction by what products to use and where as well as following the face chart and I think I did really well and she was pleased with the outcome. It was decided that she was going to go and revise her idea a bit more and possibly add something to it, as it didn't take me too long and I could definitely use some more skills. I think once she found out my level of skill in application we then said that we could do something a bit more intricate.
This design used a lot of she sills we learnt for the classic Elizabethan look, using supra colour on the eyebrows and just blushing the apples of the cheeks.
One problem I did find was that I need to be more careful with the eyebrows and applying the white. Avoiding the skin and getting to the root was a bit difficult a removing the supra colour from the skin base was hard because it's thicker and doesn't blend in. To combat this I will put less product on my mascara wand and build up slowly.


First Practice, My Design

My initial practice with Lauren went really well and she did everything I asked to a T without ny issues, from the amount of base and texture I wanted to create.

We began withe the base and the contouring around the eyes I had decided on a few colours I wanted to be blended together but with Lauren's larger arsenal of products we chose some that would enhance the effect I wanted.
I used the same products for both the eyes an cheeks because it was all contouring rather than definite specific eye make-up and different shadows on the cheeks, I wanted all the shaping to be the same.


The tear effect were a new thing and it was interesting to see how Lauren used the product. She used a smaller brush than I would have to drop the Aqua colour onto the face and like I found out she used a cotton bud to stop any product going further than planned, even though it's very uncontrollable it made it easier to be able to place it where we wanted it.

First we used black from the Aqua palette and added purple on top of it. I wanted some different tones to show through, and because the drips wont fall directly on top of each other it was a chance to not just do a single colour and for them to mix an make some areas darker and some just coloured.


We next looked at flicking colour onto the face which was in my final design after I had practiced this in session time and on Lauren's design previously.
It was interesting having this done to yourself because as I mentioned earlier when I did it on my model and it made her flinch each time, I did this as well because you cant see what's coming.
Initially I was only going to do this on the lips but we decided it needed more on the face to make it seem more balanced on the face so we then added this to the temple, but only on one side covering beneath with tissue.


All in all I think this practice session went really well, there are certain things I will tweak,
I want to cover my brows for the final assessment which will add to the effect but we didn't have chance to do it here.
I really enjoyed seeing my design all come together on the face after simply looking at the face charts I had designed.
I will also add some black under the eyes, possibly just some graphic liner, to emphasise where the black has come from an because I think it will look good in contrast to the splashes and incorporate some line work.
I want to add some white eyelashes onto this too, not too big so they don't distract too much but to again add some definition into the eyes.

Wednesday, 18 November 2015

Technique Practice on my Elizabethan base

After finishing my Elizabethan base I decided to practice with some techniques. I spoke to Sue and got some help on how I could use some different products for different effects.

I used the Aqua colour palette to begin with because it's a nice medium to use and I began to practice with some tear effects around the eye area.
Beginning with a simple black and slowly building up to see how it layers and using different ratios of water to product producing a translucent runny colour or a more denser finish.
I do realise with the left side that I went too far out of the corner but this was simply because I run our of space under the eye to practice dropping the product.

Some of them I did by having a really wet brush, only a small blending brush but one that would hold liquid and allowing it to drip onto the face and roll down and another I did with the head back and once the product was on I asked my model to sit up and allow the product to naturally run.
This kind of worked but it was a bit unpredictable so I'm not really a fan of this.

On the right hand side I decided on a colour to use and it gave a bit more of an interesting finish rather than just black which is a bit boring and predictable in all honesty. For this one I lightly pressed the brush to the skin without it being too wet but it was watered down a lot and I just created an area that looked as through the eyes had been watering but not enough to run, Any drips I used a cotton bud to stop and this worked well as it absorbed any extra product and also made it controllable.

Another effect I tried was to flick the colour onto the face. I used a denser brush for this and just using my finger on the bristles to get the product to flick off.
This was an interesting thing to do, I had to prepare my model because with the eyes closed you can't see whats coming and it makes them flinch when it hits the skin. We found this funny anyway.
The consistency seemed important for this for it to be wet enough to flick accross the face and also with enough colour to be noticeable.
I like the effect it gave and the way it's random and unplanned, it's buildable as well but being precise is hard with this, an option is to cover parts of the face which you don't want affected.
It fits with the theme of being a little bit primitive in application techniques and I want to convey this into my design somewhere.


Some final things I tried were a very light wash over the eye and that gave a good soft effect, it worked well over the base. Something I was worries about was being water based if it would take off the foundation underneath but it didn't seem to be an issue,
I then added more and more until I had gone too far.
Something with these kinds of techniques, or with anything is that less is more and to know when to stop. It was very very easy to overkill on this which I did by the end when I added black to the red and they didn't drip as planned but it was good to find that point so I know for future reference. Adding more will result negatively and step away for a moment and come back to it.

Overall I had a lot of fun trying all these different things out and just seeing the effects produced, It's given me something to think about for my final design in terms of technique and products.


I also tried adding some gold to the black side and I just really didn't like it, I definitely want to stay away from gold.


Classic Elizabethan

Consultaion.
Name: Nikki Thorpe
Age: 23
Skin type: Normal to Dry, T zone dryer than other areas.

Skin tone: Pale with slight pink undertones.
Eye colour: Blue
Eye Shape: Large eyes.
Allergies: N/A
Medication: N/A
Contraindications: N/A

Tools
Illamasqua Skin Base White
Illamasqua Translucent Powder
Supra Colour - White
Foundation and Buffing Brushes
Powder Puff, Large Powder Brush
Blush Palette
Disposable Mascara Wand

Applying the Traditional Elizabethan Make-up was an interesting session because it threw a lot of the techniques we had learnt, but also added a lot of new ones.
The Idea of traditional Make-up is thinking along the lines of how it would have been applied then with limited tools.
There were no specific brushes, no lip brushes or fine liners or anything like that and a lot of it would be applied with the hands and fingers.

For the Elizabethan base we didn't use as much moisturiser which created a rougher base for this and also although my model's skin was quite dry it nicely added to the effect, also using a matte primer gave a good finish because it stopped the dewy look.

Incidentally I over buffed the foundation after applying it and powdered heavily before realising,
I then went back in with foundation on top of the powder and ended up with a mottled broken effect which I really liked because it showed a lot more texture and I thought it was a lot more accurate to how the skin would have looked at the time with the application being so heavy. A happy mistake!


Another interesting element was using supra colour on the eyelashes and the eyebrows and eyelashes,
I hadn't used anything other than usual products on brows or eyelashes before just gels and pencils and normal black mascara on the lashes.
The supra colour worked the same as any other type of gel products due to it's consistency and it was easy to work with after warming up on the back of the hand.

The struggle was when using the disposable wand not to touch the skin, the supra colour is really hard to remove off the base because it's so dense.
It required a very light touch over the brows just to get the hair, and get right to root as well.

The next step was to add rouge to the lips and cheeks we used a very simple method to do this, choosing any kid of red/ pink based blush from the palette depending how subtle or extreme you want to go, I chose a mix of light pink and red and using my finger I lightly swept this over the lip.

An interesting effect I found doing this was when the lips weren't stretched out it retained the creases and gave a nice broken effect. It was also nice not to worry too much bout the lip line or going over because it was supposed to look quite rough.

For the cheeks I used the same shades and applied it in a small circle on the apples of the cheek, in great contrast to how blush is applied today, which is blending up the cheekbone, instead I stippled the powder in one specific area.


I enjoyed creating this look, particularly because it was done in a traditional style and we did a lot of new techniques.
Although I did make a mistake on the foundation I ended up with something I liked which makes me want to test more products with each other and see how they react and what effects thy create.
In contrast to modern day techniques which call for being flawlessly smooth and blended to the death it was refreshing to do something different.

Using different products for different areas on the face was good because it got some idea rolling, for example, using blush on lips and Supra colour mascara. It lead me to think about using materias what weren't even cosmetics like natural stains from fruit. crushed berries on the lips would stain and create a brilliant crimson or blackberries for a deep purple.
Again, other materials could be using non-toxic paint on the skin which would dry or a face mask and then crack creating broken porcelain effect.

Friday, 13 November 2015

Celebs Who Rock No Eyebrows

Recently it has come into the limelight and become fashionable to have bleached or no eyebrows and a number of public figures have been trying this out in the last few years.
This is interesting when looking at Elizabethan beauty ideals that it is still coming back into popular culture, I can see it being more of a publicity stunt than actually a fashionable statement because it's just simply not something which would become widely popular. I think celebrities get away with such a striking look because they have the following and popularity behind them, much the same way that Elizabeth I did. I don't think she would have really been the ultimate beauty icon if she wasn't as prominent and popular.

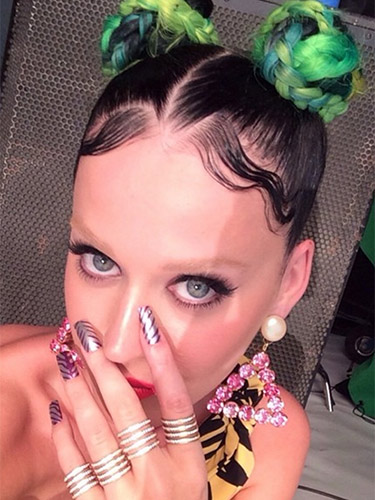
We're presuming this was for a photo shoot, but then again KP could do her weekly shop in such fierce styling and pull it off. The extreme blonde brows against her jet black (oh, and green) hair make a stark contrast.
CELEBRITIES WITHOUT MAKEUP ON
11 BEAUTY TIPS FROM A-LIST MODELS
KILLER CELEBRITY NAIL ART SNAPS
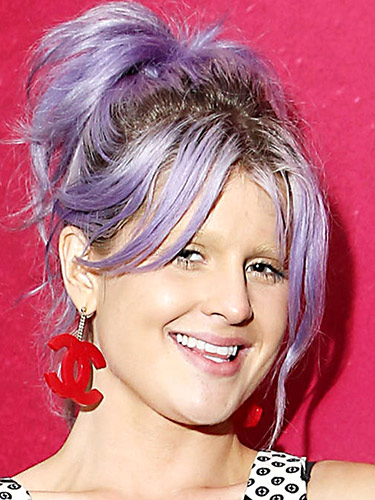
An early adopter of the trend (of course), Kelly O looked super cool with bleached brows last summer, accessorising them with her lilac locks and red Chanel earrings.
CELEBRITIES WITHOUT MAKEUP ON
11 BEAUTY TIPS FROM A-LIST MODELS
KILLER CELEBRITY NAIL ART SNAPS


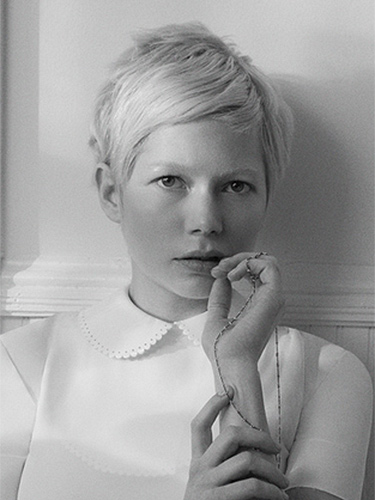
The actress was styled up for Interview magazine with bleached brows to match her pixie crop. The monochromatic beauty look is the antidote to harsh, heavy makeup and is perfectly executed by a natural beauty like Michelle.
CELEBRITIES WITHOUT MAKEUP ON
11 BEAUTY TIPS FROM A-LIST MODELS
KILLER CELEBRITY NAIL ART SNAPS
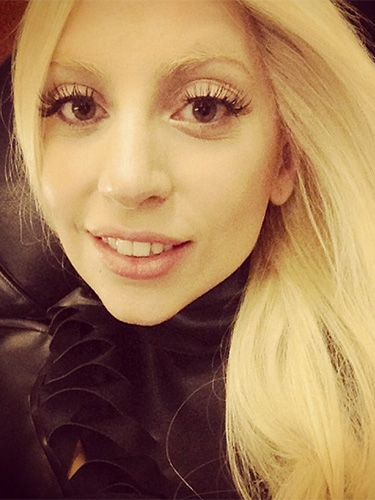
In this selfie snap, the singer matched her brows to her bleached hair. We're not sure what Lady Gaga really looks like, but we're pretty sure neither hair here is natural. Nice though!
CELEBRITIES WITHOUT MAKEUP ON
11 BEAUTY TIPS FROM A-LIST MODELS
KILLER CELEBRITY NAIL ART SNAPS


It is also popular in photography nowadays as well, and for runways and on models because of the striking look it produces by taking away the eyebrows. It creates an alien look and unreadable expressions.


ref
COSMOPOLITAN, n.d. Celebritites doing the bleached brow trend [online] [viewed date]. Available from: URL http://www.cosmopolitan.co.uk/beauty-hair/celebrity-hair-makeup/g3510/celebrities-with-bleached-eye-brows/?slide=4

THE IMPRESSION, 2015, Sam Rollinson for Dior Magazine [online] [viewed date] Available from: http://theimpressionarchive.com/campaigns/view/sam-rollinson-for-dior-magazine-spring-1#

Practice Brow Covering

So for my final design, I wanted to have as little or no eyebrows at all on it, Since we had not covered this as of yet in lesson time it was something I needed to practice.

I had vague idea of how I could do it and there are plenty of tutorials online such as this one below but a lot of them, unless you really practice over and over are really not as easy as they look.


Which I found out.
I began with using a glue stick and applying it straight from the tube onto my brow, beginning with backward strokes and then forward and using a comb to really get it through the hairs.
I used 3 layers, leaving it to dry in between and then covered with some concealer.
This really just wasn't working.
I could see all the detail left form the hairs and no matter how many layers I did they kept showing through.
These were thin layers though just going over with the end of the stick.


I then removed this and tried it again, trying to be really precise with the glue stick and really making sure it was dry, and smoothing down after each layer with a spatula. Even powdering in between layers which barely made a difference so that was a bit pointless.
It definitely looked smoother but after speaking to Sue she made it clear that if you can't do it properly or convincingly, just don't do it at all, especially when going on camera.
Obviously on this one I blended out the concealer and powdered, on the trial above it just wasn't even worth trying because there was too much texture left.


On the third trial I think I definitely improved and for this I scraped off the glue before applying it, warmed it up on the back of my hand and used quite thick layers, It took longer to dry in between but it helped get rid of a lot of texture.
What I struggled with most was the hairs on the inner side because they just stuck out no matter what I did, but I think overall I have improved with the technique even if it's different to what most 'tutorials' say to do, it worked for me.


I then just added some make-up because why not..


After Speaking to my partner Lauren about it she has a little but more experience with special effects and she suggested to use wax which we both tried in the studio and this was the best method, because of it's consistency it was easy to manipulate over the brow with a spatula when warm, it blended into the skin on the edges and there was also no chance of it cracking or going funny when it dried, it moved nicely with the face.
using a thicker layer wasn't an issue either because it doesn't require drying time and it smoothed the texture of the hair really well. It also didn't need a great deal of concealing either, the skin base foundation worked really well over the top.

This was the best result I had achieved from covering the eyebrows so whether I do cover or not this will be the method I use


ref
Youtube, 2014. How to cover brows. JOSEPH HARWOOD. Available at: https://youtu.be/F9Lieqsacb8